Creating Custom Shift Codes
- Kyle Gray (Unlicensed)
- Tim Hampton (Unlicensed)
Air Maestro allows you to customise the shift codes for each rostered day, depending on your requirements. For example, if you have created a ‘Day’ shift code with a start time of 0730-1700, but you require the rostered user to start the shift later on that day, you can customise the start time and enter a comment.
Step-by-step guide
Select
 Operations >
  Roster. The Online Roster screen is displayed in a new window.
Click Expand [
 ] for the required base location and department.
- Select the Query tool [
 ] in the Tools pane.
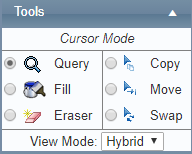
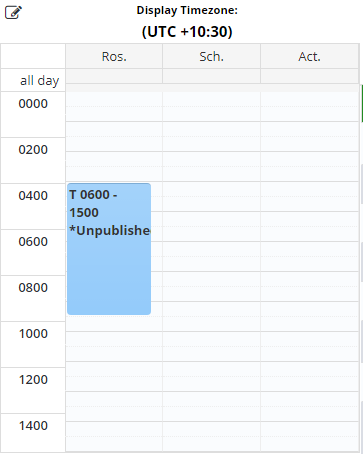
Click the required shift in the Calendar pane. The dialog box detailing the work practice and shift time is displayed.
- Click [Change], to change the default work practice for the shift.

Select the required work practice from the Work Practice drop-down list.
- Click [Apply]. The work practice is updated for the current shift.

- Click the rostered shift below the Ros. Text. The Edit Duty Period pane is displayed.
Adjust the duty, shift and flight times as required.
- Enter the reason for the shift change or any special conditions in the Note field.
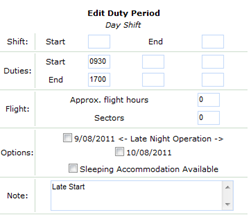
- Click [Update]. The rostered shift time is adjusted in the Ros. Column.
Click [X] to close the dialog box. In the Calendar pane the shift code is displayed with a coloured triangle in the top right corner. The triangle indicates that the item contains custom data and a note.
- If you update any shift times or include notes for any shift code, these changes are highlighted to the user when they view My Profile > My Roster in the Changed Duty Periods and Notes panes.
Related articles
Rostering Module Guide: