Creating Tasks
- Kyle Gray (Unlicensed)
- Dan Le (Deactivated)
Step-by-step guide
- Select Operations > Scheduling > Scheduler. The Scheduler screen is displayed.
Modify the filters and views to suit your requirements.
Select the required date period using the date picker.
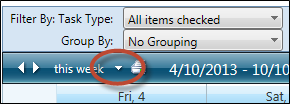
The Scheduler for the selected period is displayed.- Select the preferred view for the selected date period. In the example below, the Timeline view is selected with a Single Day zoom and is grouping the tasks by Aircraft.
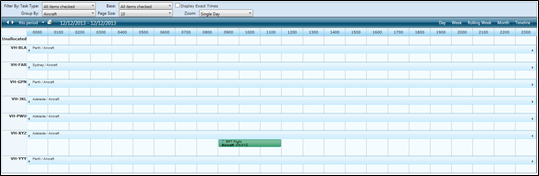
- Double-click on the required date/time in the scheduler to create a new task. The Create Task dialog box is displayed.

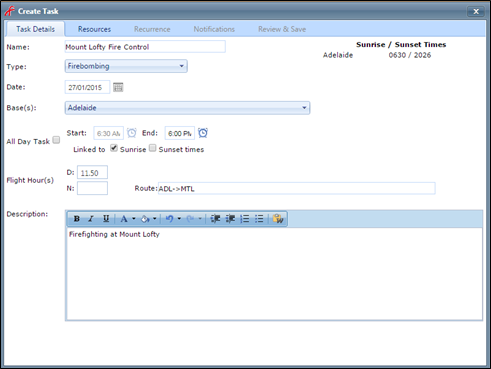
Complete the fields on the Task Details tab.
Field
Description
Name
Enter the task name in the Name field.
Type
Select the task type from the Type drop-down list.
Date
Edit the task date if required.
Base(s)
Select the base(s) related to the task.
All Day Task
Select the All Day Task option if the task spans the entire day. Alternatively, unselect the All Day Task option to enter a specific start and end time for the task. If entering start and end times for the task, you have the option to link the start and end times to the sunrise and/or sunset times for the base location. This option is only available if the Display Sunrise/Sunset Times in Scheduler option is enabled via Manage > Setup > Scheduling > Global Settings.
Flight Hour(s)
Enter the total day and night flight hours related to this task if applicable.
Route
Enter the route for the task if the task involves a flight. Alternatively, if the task consists of a number of legs, complete the Leg Details tab with the leg information, which will automatically update the Route field on this tab.
Description
Enter a description for the task.
- Select the Resources tab. The required resources for the task type are displayed as set in the task type setup.
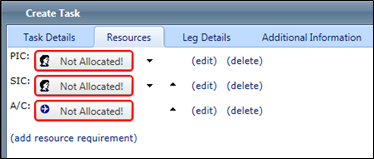
Assign the required resources to the task by clicking on the Not Allocated! button. The Select Resource dialog box is displayed.
Select the required resource from the Name drop-down list for personnel and the Registration drop-down list for aircraft. Further information about the selected resource is displayed.
 Only resources matching the task resource requirements (endorsements, recency, departments etc.) are displayed in the drop down list. Resources not meeting the resource requirements can be selected by typing the resource name into the drop down list.
Click [Set Resource]
- Select the Leg Details tab if legs are required for the task. Alternatively, if legs are not required proceed to Step 13.The Leg Details tab is only displayed if the ‘Track Flight Leg Data’ option is selected in Manage > Setup… > Flight Records.
Complete the fields on the Leg Details tab.
Field
Description
Planned Departure – Time
Enter the expected departure time for each leg.
Planned Departure – Location
Enter the expected departure location for each leg. This field is linked to the locations register and detects previously entered locations. If the departure location is not in the list, you can enter a new location in the text box.
Planned Arrival –Time
Enter the expected arrival time for each leg.
Planned Arrival – Location
Enter the expected arrival location for each leg. This field is linked to the locations register and detects previously entered locations. If the arrival location is not in the list, you can enter a new location in the text box.
Length
This field is automatically calculated based on the time entered in the Planned Departure – Time and Planned Arrival – Time fields for each leg.
Route Summary
This field is automatically populated based on the Planned Departure – Location and Planned Arrival – Location fields for each leg.
Update Route and Flight Hours From Legs
Select this option to automatically update the Route and Flight Hours fields on the Task Details tab.
Total
This field is automatically populated based on the total of all the Length fields.
- Select the Recurrence tab.If the task occurs only once, do not complete the Recurrence tab and proceed to Step 16.
Complete the fields on the Recurrence tab.
Field
Description
Start Date
Enter the start date of the task.
Frequency
Select the frequency of the task.
Options include:
- Hourly
- Daily
- Weekly
- Monthly
- Yearly
Additional options are presented based on your selection.
For example, if you select the daily option, you can specify whether the task occurs every weekday or at set intervals.
End Date
Enter the end date of the task. If the task occurs indefinitely, select the ‘No end date’ option. Otherwise, specify an end date or end the task after a set number of iterations.
Click [Create Recurrence]. The new recurrence rule is displayed in the Recurrence Rules pane.
Select the Notifications tab. The Default Schedule Notifications settings for the task type are displayed.
Enter the required notification window for the task in the Notification Window field. Enter the number of hours before the task is scheduled to begin, where the email alert should be generated. The notification is only sent if the task does not meeting one or more of the resource requirements.
- Select the time zone corresponding with the location of the task.
Select the personnel that must be notified for this task if the task requirements are not met from the Personnel to notify via Email drop-down list.
Select the Review & Save tab. The Additional Information (if applicable) and Resource Validation panes are displayed.
Review the Additional Information pane. This pane contains the list of required custom fields contained on the Additional Information tab which are incomplete.
Review the Resource Validation – Resources pane. Click the resource name to display the resource details (Roster Data, Recency Information, Experience, etc.).
Review the Resource Validation – Task Rules pane.
Field
Description
Task Rules
The Task Rules column validates whether the assigned resources met the resource requirements for the task. For example, if the task requires a pilot to be endorsed on the A109 aircraft type and the assigned pilot does not have this endorsement, the
 icon is displayed in Task Rule column.
The
 icon indicates that the assigned resources meet the resource requirements for the task.
The
icon indicates that the assigned resources do not meet the resource requirements for the task.The
 icon indicates that the assigned resource has not been toured to the base location associated with the task.
To tour a resource from this view, click the icon in the Task Rules column to display the Tour Resources dialog box.
Review the Resource Validation – Rostered pane.
Field
Description
Rostered
The Rostered column validates whether the assigned personnel resources have been rostered for ‘Duty’ or ‘Standby’ shifts. For aircraft resources, the Rostered column validates whether the assigned aircraft is online (based on the Aircraft Register).
The
 icon indicates that the assigned resources are rostered (personnel) or online (aircraft) for the duration of the task.
The
 icon indicates that the assigned resources are not rostered (personnel) or online (aircraft) for the duration of the task and the task requires the resources to be rostered. This option is specified via Manage > Setup… > Scheduling and by selecting the Task Types tab. Next, click the pencil icon corresponding with the task type and select the Ensure Resources are Rostered tick box.
The
 icon indicates that the assigned resources are not rostered (personnel) or online (aircraft) for the duration of the task but the task does not require the resources to be rostered.
To roster a resource from this view, click the icon in the Rostered column to display the rostering dialog box.
Review the Resource Validation – Overlap pane.
Field
Description
Overlap
The Overlap column validates whether the assigned resources have been assigned another task where the times overlap with the current task.
The
icon indicates that the assigned resources do not have overlapping tasks.The
icon indicates that the assigned resources have overlapping tasks and this is not permitted in the Task Type setup. This option is specified via Manage > Setup… > Scheduling and by selecting the Task Types tab. Next, click the pencil icon corresponding with the task type and select the Don’t Allow Resources To Multi-Task tick box.The
icon indicates that the assigned resources are not rostered (personnel) or online (aircraft) for the duration of the task but the task does not require the resources to be rostered.Review the Resource Validation – WP (Work Practice) pane.
Field
Description
WP
The WP column validates whether the assigned resources met the work practice rules associated with the rostered shift.
The
 icon indicates that the assigned resources are within the work practice limits.
The
 icon indicates that the assigned resources are approaching the work practice limits.
The
 icon indicates that the assigned resources have exceeded the work practice limits.
Click [Save]. The Create Task dialog box is closed and the task is displayed in the scheduler.
Video Guide:
Related articles
Scheduling Module Guide: