Creating Recency Check Forms
- Kyle Gray (Unlicensed)
- Dan Le (Deactivated)
Air Maestro’s recency check form function allows organisations to create online checklists and associate them with applicable recency items. These check forms can then be used during routine recency assessments (Induction, Line Checks, Base Checks etc) to assess the competency of personnel. In addition to capturing specific recency assessment criteria, the forms contain personnel details, aircraft details, comments and associated documents.
The process for creating a recency check form requires four steps.

Step-by-step guide
Step 1 - Create a Rating Scale
A rating scale is a collection of possible selections for any evaluation that is being performed within the check form. For example, this could be a scale of 1 to 10 or a scale including Good, Acceptable and Poor.
You can create multiple rating scales for use in your check forms based on your company requirements. For each header and checklist item in a check form, you may associate an applicable rating scale.
Select
 Setup> Select Recency Check Form Setup under Operations. The Recency Check Form screen is displayed.
- Select the Rating Types tab.

Select

Enter a meaningful name for the rating scale in the ScaleName text box. For example, 1-5, competent/not competent etc.

Click

Click
 corresponding with the new rating scale to create the applicable options.
Click
 to insert a new option name.
Enter a meaningful name for the option in the Option Name text box. For example, competent, poor, fair, etc.

Click

Repeat Steps 7-9 to add the additional options applicable to the rating scale.
Use the arrows [
 ] to change the sort order of the options in the rating scale.
Step 2 - Create a Checklist
A checklist is a set of one or more evaluations assessed within a check form. All checklist items must be grouped under a header. For this reason, a header must be created before any checklist item. The text in the header should reflect the checklist items that exist below it. For example, the header ‘pre-flight procedures’ would be appropriate for a group of checklist items used to evaluate a pilot’s competency with pre-flight processes.
The evaluations can be linked to a rating scale. In the example below, the text ‘Evaluation’ is a header item in a checklist, while the text ‘Handling skills – Visual’ is a checklist item. The choices ‘very good, good, acceptable, poor and very poor’ are options contained in a linked rating scale.

Select
Setup> Select Recency Check Form Setup under Operations. The Recency Check Form screen is displayed.Select the Recency Checklist tab.
- Select

Enter a meaningful name for the checklist in the Name text box.
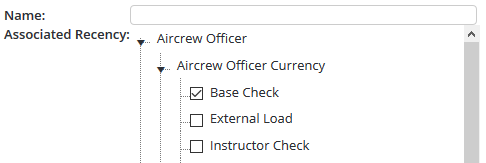
- Select the recency items that you would like to have the option to update whilst undertaking the checklist in the Associated Recency tree. The recency items contained in this tree reflect the recency items created in the recency setup area. In this example, the ‘Base Check’ checklist, allows the examiner to update the examinee’s GPS/DME, GNSS/ RNAV, VOR, Airfield Duties and Line Check recency.
Click

Click
corresponding with the new checklist to create the applicable checklist items.
Click

Enter a meaningful name for the header item in the Header Text text box.
Select an applicable control type for the header items from the Control Type drop-down list.
Select an applicable rating scale from the RatingScale drop-down list.

 If a rating scale is not required for the header item, select ‘None’ from the Control Type drop-down list.
Select the Show Comment Box tick box to display a comment box for the header item.
Click

Repeat Steps 8-13 to continue adding additional headers to the checklist.
Click

Enter a meaningful name for the checklist item in the Checklist Item Name text box.
Select the applicable header for the checklist item from the Header drop-down list.
Select the applicable control type from the Control Type drop-down list.
Control Type
Description
Label
Select the Label control type to include a text label within the check form.
Checkbox
Select the Checkbox control type to include a check/tick box for the checklist item. This control is used to indicate whether the criterion specified by the checklist item is present.
Checkbox List
Select the Checkbox List control type to include a series of check/tick boxes for the checklist item. This control is used when one or more options may apply to the checklist item.
Radio Button List
Select the Radio Button List control type to include a series of radio buttons for the checklist item. This control is used where the user is required to select a unique option from a series for the checklist item.
Dropdown List
Select the Dropdown List control type to include a predefined list with a series of options for the checklist item. This control is used when the information to be entered into the checklist item is limited to particular words and phrases and only one option may be selected.
Select an applicable rating scale from the Rating Scale drop-down list.
Repeat Steps 15-22 to continue adding additional checklist items to the checklist.
Click

Repeat Steps 15-22 to continue adding additional checklist items to the checklist.
Step 3 – Setup Sign-Off Personnel
- Select Setup> Select Recency Check Form Setup under Operations. The Recency Check Form screen is displayed
- Select the Check Form Options tab.
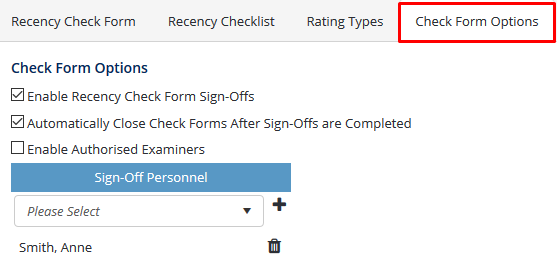
Select the Enabled Recency Check Form Sign-Offs tick box.
Select the Automatically Close Check Forms After Sign-Offs are Completed tick box, to automatically close check forms once all sign-offs have been obtained. If this option is unselected, check form managers must click [Close] after sign-offs have been obtained to close the check form and update the examinee’s results.
Select the required sign-off personnel.
- Click

Repeat Steps 5-6 to add additional sign-off personnel.
Step 4 – Assemble a Check Form
Before you can assemble a check form, you must ensure you have created the applicable checklist (and associated rating scales) and setup the applicable sign-off personnel.
Select
Setup> Select Recency Check Form Setup under Operations. The Recency Check Form screen is displayedSelect the Recency Check Form tab.
Select

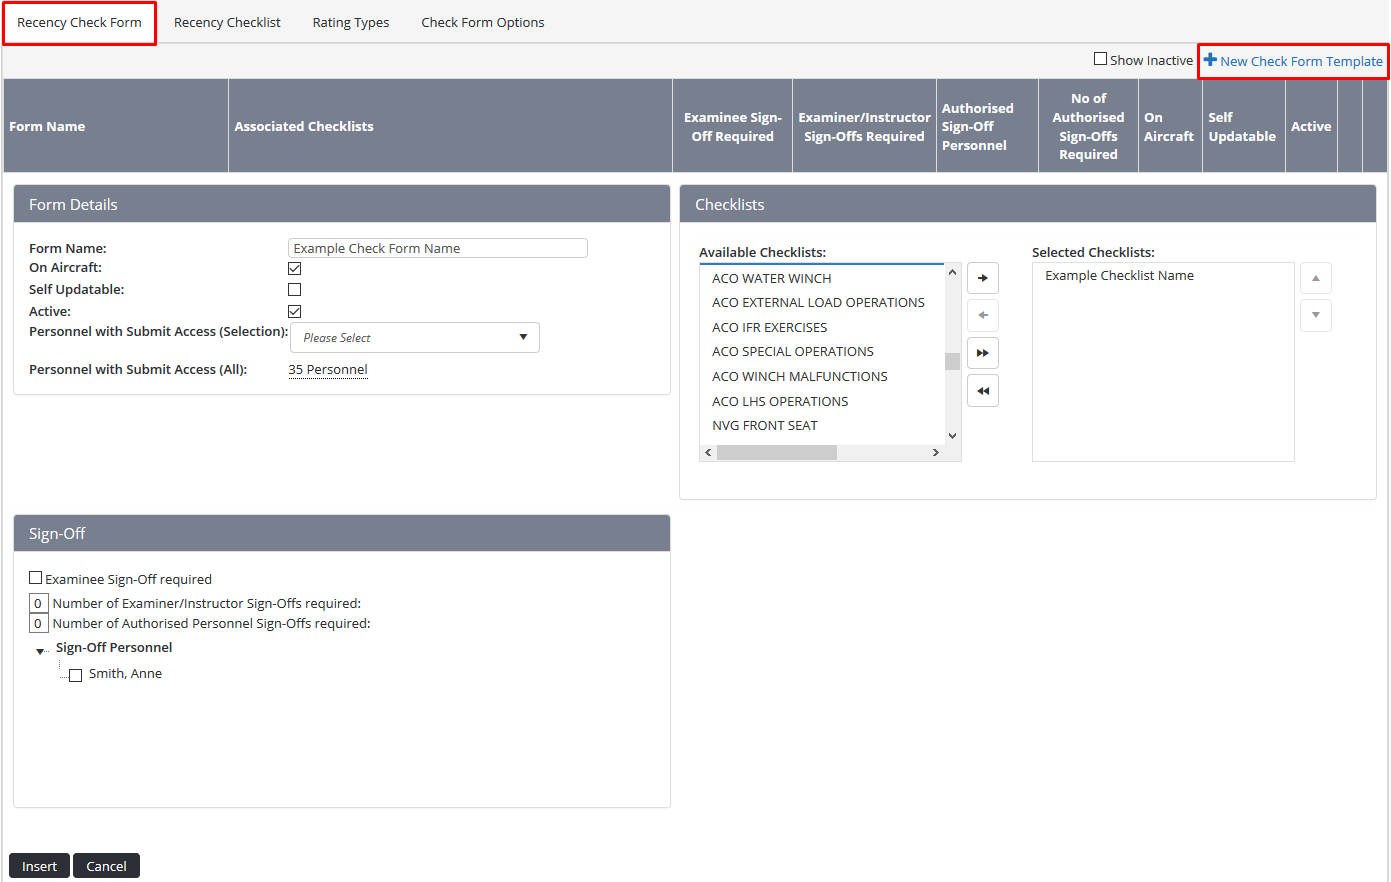
Enter a meaningful name for the check form in the Form Name text box. For example, Base Check, Line Check, Induction Check etc.
Select the On Aircraft tick box, to display the following fields in the check form: Pilot, Route Flown, Primary Aircraft, Secondary Aircraft, and Check Performed On.

Select the applicable checklist templates associated with this check form in the Associated Checklists pane. Use
 to select the highlighted checklist or
  to select all the available checklists.
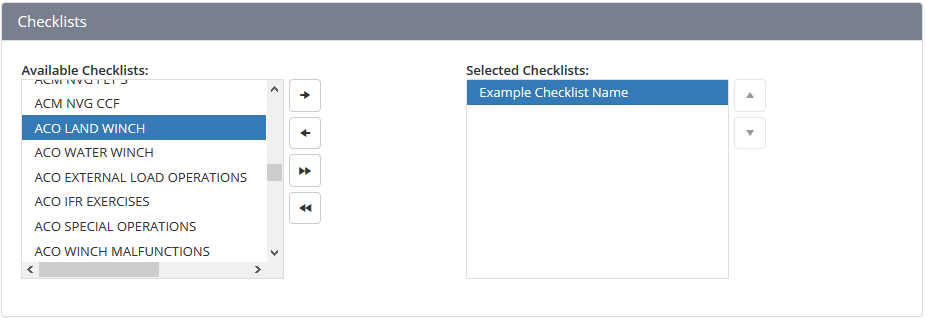
Select the applicable sign-off personnel in the Sign-Off Personnel listing.
 To add additional personnel to this listing, provide the Check Forms > View Selection or View All access level to the required personnel.
Control Type
Description
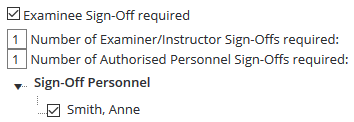
Examinee Sign-Off Required
Select whether the examinee is required to sign-off the check form once it has been completed by the examinee.
Examiner/Instructor Sign-Off Required
Select whether the examiner is required to sign-off the check form once they have completed and submitted the form.
Number of Authorised Personnel Sign-Offs Required
Select the number of sign-off personnel that are required to sign-off the check form before it is completed. For example if you enter ‘1’ and you have nominated ‘2’ sign-off personnel, as soon as one of the sign-off personnel sign-offs the check form progresses into the ‘Completed’ status and no further sign-offs are required.
Video Guide:
Related articles
Check Forms Module Guide: