Updating Personnel Recency
- Kyle Gray (Unlicensed)
- Tim Hampton (Unlicensed)
For personnel to remain current, the recency contact for each recency item must record the date the person last conducted the recency requirement (with the exception of self-updatable items). Personnel are reminded of their outstanding recency requirements in the Alerts screen. Personnel can only update recency items which are self-updatable. Self-updatable recency items (for example, an ILS) are determined in the recency setup. All other recency items must be updated by the recency contact.
Step-by-step guide
- Select
 Operations >
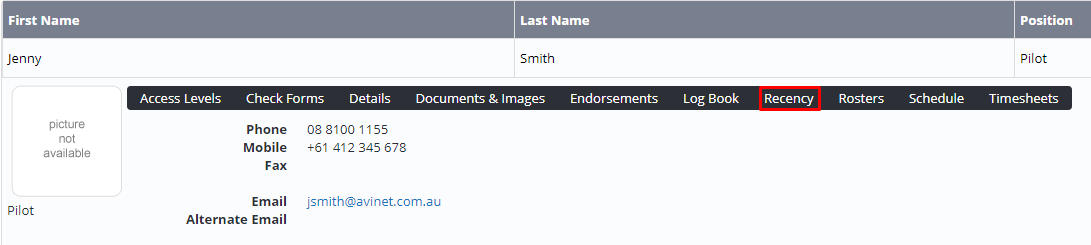
  Personnel. The Personnel screen is displayed.
 Alternatively, if the user is visible in the Timesheet Summary on the Home screen, click the recency traffic light icon corresponding with their name. The Recency screen is displayed. Proceed to Step 4.
 - Filter the Personnel screen according to your requirements.
- Enter filter criteria in the text-box and click [Filter].
- Select a value from the Department drop-down list to view personnel located in a particular department.
- Select a value from the Base drop-down list to view personnel located in a particular base location.
- Select the Show In-Active tick box to include personnel that are no longer active in the system. This includes personnel which have ceased employment with your organisation.
Click [Recency] to view detailed recency information for the individual. The Recency screen is displayed.
Field
Description
Last Conducted
The date the selected individual last performed the recency item.
Expires
The date by which the selected individual is required to perform the recency item.
Status
The selected individual’s compliance status with the recency item.
Required
A tick icon in the Required column, indicates an item which the selected individual must perform, to remain complaint.
Optional
A tick icon in the Optional column, indicates an item which the selected individual can perform, but is not required for their compliance.
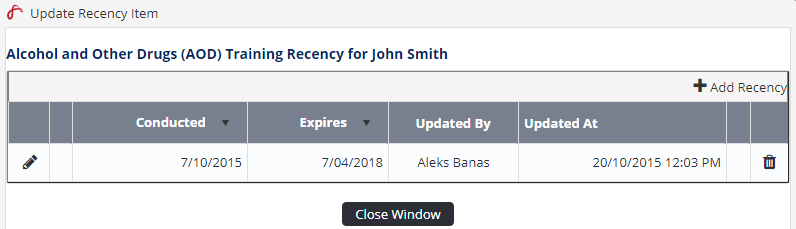
- Click the magnifying glass corresponding with the recency item to update. The Update Recency Item dialog box is displayed. If the item has previously been conducted, a record of the last conducted date, expiry date and the user who updated the item is displayed.
Click [Add Recency]. The Last Conducted, Expires, Comments and File fields are displayed.
Enter the date the recency item was last conducted in the Last Conducted text box.
Click the Recalculate Expiry Date icon to view the new expiry date.
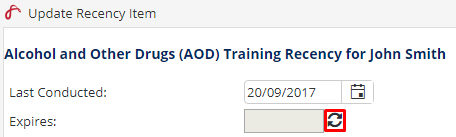 The new expiry date is calculated based on the rules setup in the Recency Setup area.
Enter any remarks relating to this recency item in the Comments text box.
Click [Select] in the Image pane and browse for the file related to this recency item.
Click [Open]. The file name is populated in the File text box.
Click
 . The recency item is updated with the last conducted date.
Click
 to return to the Recency screen. You are prompted to refresh the screen.
Click
 to update the screen with the new expiry date.
Related articles
Recency Module Guide: